How to use
Anyone can start using this aplication for free.By paying for a subscription, you can increase the number of people who can share data, the number of parts and schedules that can be registered.
Tosmmi uses WebSockets over port 443.
If websockets are prohibited in your proxy or firewall settings, you will need to allow communication via websockets.
All communications are encrypted using SSL/TLS.
1.Sign UP
Go to the Sign Up page and enter your email address and password and push "SIGN UP" button.
A verification code will be sent to the email address you entered. To enter the verification code, click "Input verification code?" Enter your verification code and then click the "VERIFY" button.
2.Start
If the sign-up is successful, a database icon () will appear in the app bar. Click the icon to go to the app screen.
If the sign-up is successful, a settings icon () will also be displayed. In the settings screen, you can subscribe options, set up your table, create and receive invitations to share your table data, stop sharing, and delete your account. For details regarding setting, please check 10.Setting.
3.Add Part
Click the plus mark button () at the bottom of the screen. Enter Part Name and Part No. and click "OK" button. Or click the attachment button () and select a csv file. The columns in the csv file are "partNo" and "partName".
4.Close Part
Click pencil button () of "Warehouse" table.
Click "Close this part" button ().
Closed parts will be displayed in a list by pressing the "closed Parts" button () at the bottom of the app page.
On that page, you can also check past schedules set for closed parts by manage number.
By clicking on the displayed Closed part, you can check the history of that part's arrival and departure.
This is not delete.5.Set stock, order point and lead time
Click pencil button () or table header "attachment file" icon button () of "Warehouse" table.
Enter stock quantity, order point and lead time and then click OK, or select csv file.
The columns in the csv file are "partNo", "stock", "orderPoint" and "leadTime".
If you only want to change the stock quantity, leave the "orderPoint", "leadTime" and "location" columns empty.
If you only want to change the order point, leave the "stock", "leadTime" and "location" columns empty.
If you only want to change the lead time, leave the "stock", "orderPoint" and "location" columns empty.
If you only want to change the location, leave the "stock", "orderPoint" and "leadTime" columns empty.
6.Add Schedule
Click part No. in receving/shipping table. Enter receive/ship date, quantity and manage No..
If you want to add a normal receive/ship schedule, leave the "received"/"shipped" checkbox and "update stock" checkbox unchecked and click the "send" button.
If you want to add a schedule that you have already received/shipped, check the "received"/"shipped" checkbox.
If the "received"/"shipped" checkbox is turned on and the "update stock" checkbox is also turned on, the stock will be updated.
Use these checkboxes if you have forgotten to add schedules and want to add schedules at the time of receive or ship.
6.Add Schedule
Click the Attachments icon button () in the "Receiving"/"Shipping" table header and select the csv file.
The columns in the csv file are "partNo", "mdy", "quantity", "manageNo", "done" and "updateStock".
If you want to add a normal receive/ship schedule, set "done" and "updateStock" to false.
If the input schedules is received/shipped, set done and updateStock to true and read the file.
6.Add Schedule
Click "Edit manage No." button (), input manage No. to text field and press enter key.
If schedules has already been registered with the same management No., those schedules will be displayed in a list. If you enter a management No. for which no schedule has been registered, a radio button will be displayed in the header. Select "Receive" or "Ship".
Click the plus mark button () at the bottom of the screen.
Select part No. from drop-down list, input date and quantity, and click "OK" button.
You can also edit schedules on this screen.
6.Add Schedule
This method requires you to register units first. A unit consists of parts and quantities and is similar to a BOM.
Click "Units" button ().
Already registered units are displayed on the left side of the screen. If you click on the row of an already registered unit, you can edit it on the right side.
To register a new unit, make sure that "New Unit register" is displayed on the right side, enter the name, note, kind, and parts, and press the "REGIST" button.
You can also register units in csv. To register the unit, click the Attachments icon button () on the left side of the screen and select the csv file. The columns in the csv file are "name", "memo" and "kind". Please enter "receive" or "ship" for "kind".
The parts that make up the unit and their quantities can be set by clicking the Attachments icon button () on the right side of the screen and selecting the csv file. The columns in the csv file are "partNo" and "quantity".
Once registration is complete, you will be able to create schedules for that unit. Press the "MAKE SCHESULE" button.
In the "How many units?" dialog, enter the unit quantity and manage No.. If you enter a date, the dates will be entered all at once.
Click "SET SCHEDULES" button on the "Make schedules by the unit" screen to create schedules.
7.Shipping Table details
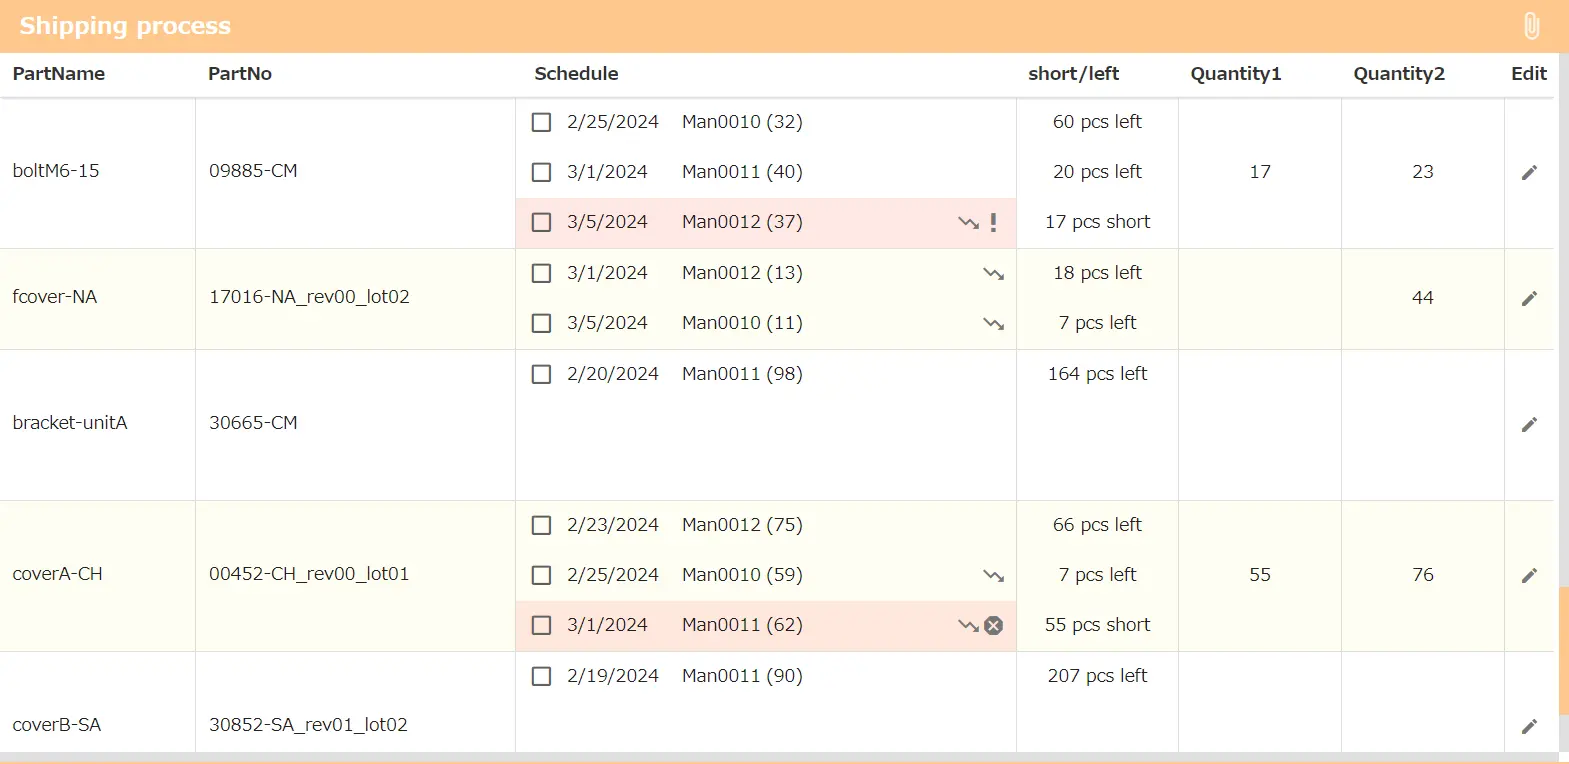
Red background schedules indicates that the shipment will not be completed.
The "equal icon" () next to the schedule indicates that the inventory will become the order point after shipping.
The "trend down icon" () next to the schedule indicates that the inventory will be smaller than the order point after shipping.
The "exclamation icon" () next to the schedule indicates that the order should be placed as soon as possible due to lead time.
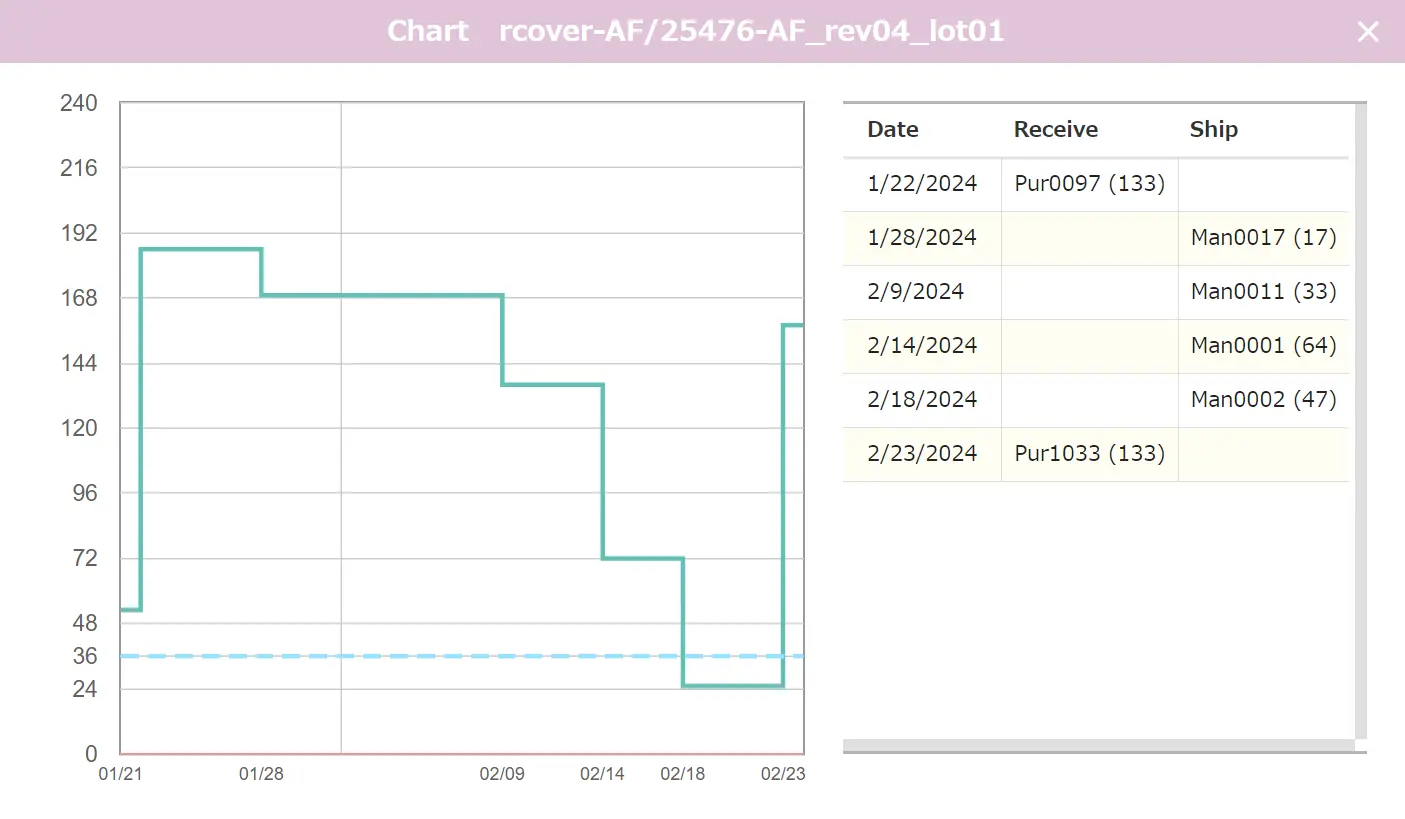
A diagram of the conditions under which the exclamation icon is displayed is shown in the second image in the image area on the right.
If the shipping date of schedules with insufficient available inventory is less than the current day plus the number of margin days, lead time days, and *1 days, an exclamation mark will be displayed.
The "NG icon" () next to the schedule means that due to lead time, even if you place an order, it will not be possible to meet the issue schedule.
If you press the "search button" () at the bottom of the screen and check the A.R. checkbox and NG checkbox, only parts that have schedules with exclamation mark icons and NG icons will be displayed.
The “short/left” column next to a schedule shows how many items are left or how many items are missing in stock when the schedule runs.
The "Quantity1" column shows how many pieces are missing to run all shipping schedules.
The "Quantity2" column shows the quantity needed to run all shipping schedules without falling below the reorder point.
*1 is 0 if items received on the same day are counted as available inventory on the same day, and 1 if items received on the same day are counted as available inventory on the next day.
The margin days and *1 can be set on the setting screen.

8.Chart details
Please check Quantity1 and Quantity2 in the second image in the right image area. By default, the quantity in the receive schedule is counted as available stock on the day after the receive schedule. If you want to count the quantity in the receive schedule as available stock on the receive date, please set it on the setting screen.

9.Close/Open manage No..
Use this function when the schedule is completed or when you want to hide and remove the schedule from calculation. (This is not "delete".)
Click manage No. to open the edit screen.
To close manage No., click "Close this manage No." button ().
Closed manage No.s can be confirmed by clicking the "Closed manage No.s" button ()
To "re-open" manage No., click on the table row and press the "Open this manage No." button ().
10.Setting
Click setting icon () to open setting screen.
The left side displays the email address of the inviter and invitee who are sharing the table data.
The right side allows you to subscribe options, set up a table, create/receive an invitations to share table data, and delete your app account.
10.Setting
If "Are received parts counted as available stock on the receive date?" checkbox is checked, the quantity in the receive schedule will be count as available stock on the receive date.
※This checkbox is only available when you are an inviter.
If you are an inviter, you can set the margin days. Regarding margin days, please check 7.Shipping Table details.
10.Setting
To share table data, enter the invitation password in "Code and password for inviting someone" and click the "MAKE INVITATION" button.
In "Code and password to receive an invitation", the person who will be shared the table data should enter the table identifier and invitation password given by the inviter and click the "RECEIVE INVITATION" button.
An invitation is valid for one hour after being created and is deleted once used.If you are an inviter, you can cancel the invitation by pressing the minus icon () next to the invitee's email address.
People whose invitations are canceled will no longer be able to access the inviter's table data in about 5 minutes.
10.Setting
Click the "EXPORT CSV" button to export the data to csv. The data includes all closed parts and closed schedules, so it may take some time.
To import the exported csv, click the "DELETE ALL DATA" button and then import.
10.Setting
You can subscribe to the option to increase the number of parts and schedules that can be registered to increase the number of people sharing data.
Without options, the number of people sharing data is 0, the number of parts that can be registered is 32, and the number of schedules is 128.
With a $5 monthly subscription, you and two people can share data and can register up to 64 parts and 512 schedules.
We call this subscription the "Starter" option.
If the number of registered data exceeds the limit, the oldest data will be deleted.
Please note that if the number of parts exceeds the limit, the part with the oldest registration date and time will be deleted, and all schedules set for that part will also be deleted.With an additional $15 monthly subscription (Total $20/month), you can share with an unlimited number of people, and there is no limit to the number of parts and schedules you can register.
We call this subscription the "Unlimited" option.
You may request to cancel your subscription at any time through the app, and your subscription will be canceled at the end of the current billing period (i.e., the period for which you have already paid).